Have you heard that annoying “drip, drip” sound lately? It often happens at night when the house is quiet. This small sound can actually be a very big problem. Many people wonder how to fix a leaking tap without spending much money. Fortunately, you do not need to be a professional plumber to solve this. This guide will help you understand every single step clearly. We will use simple words to make everything easy to follow. You will save money and feel proud of your hard work. Let us begin this journey toward a dry and quiet kitchen today.
Why is it Important To Fix a Leaking Tap Immediately?
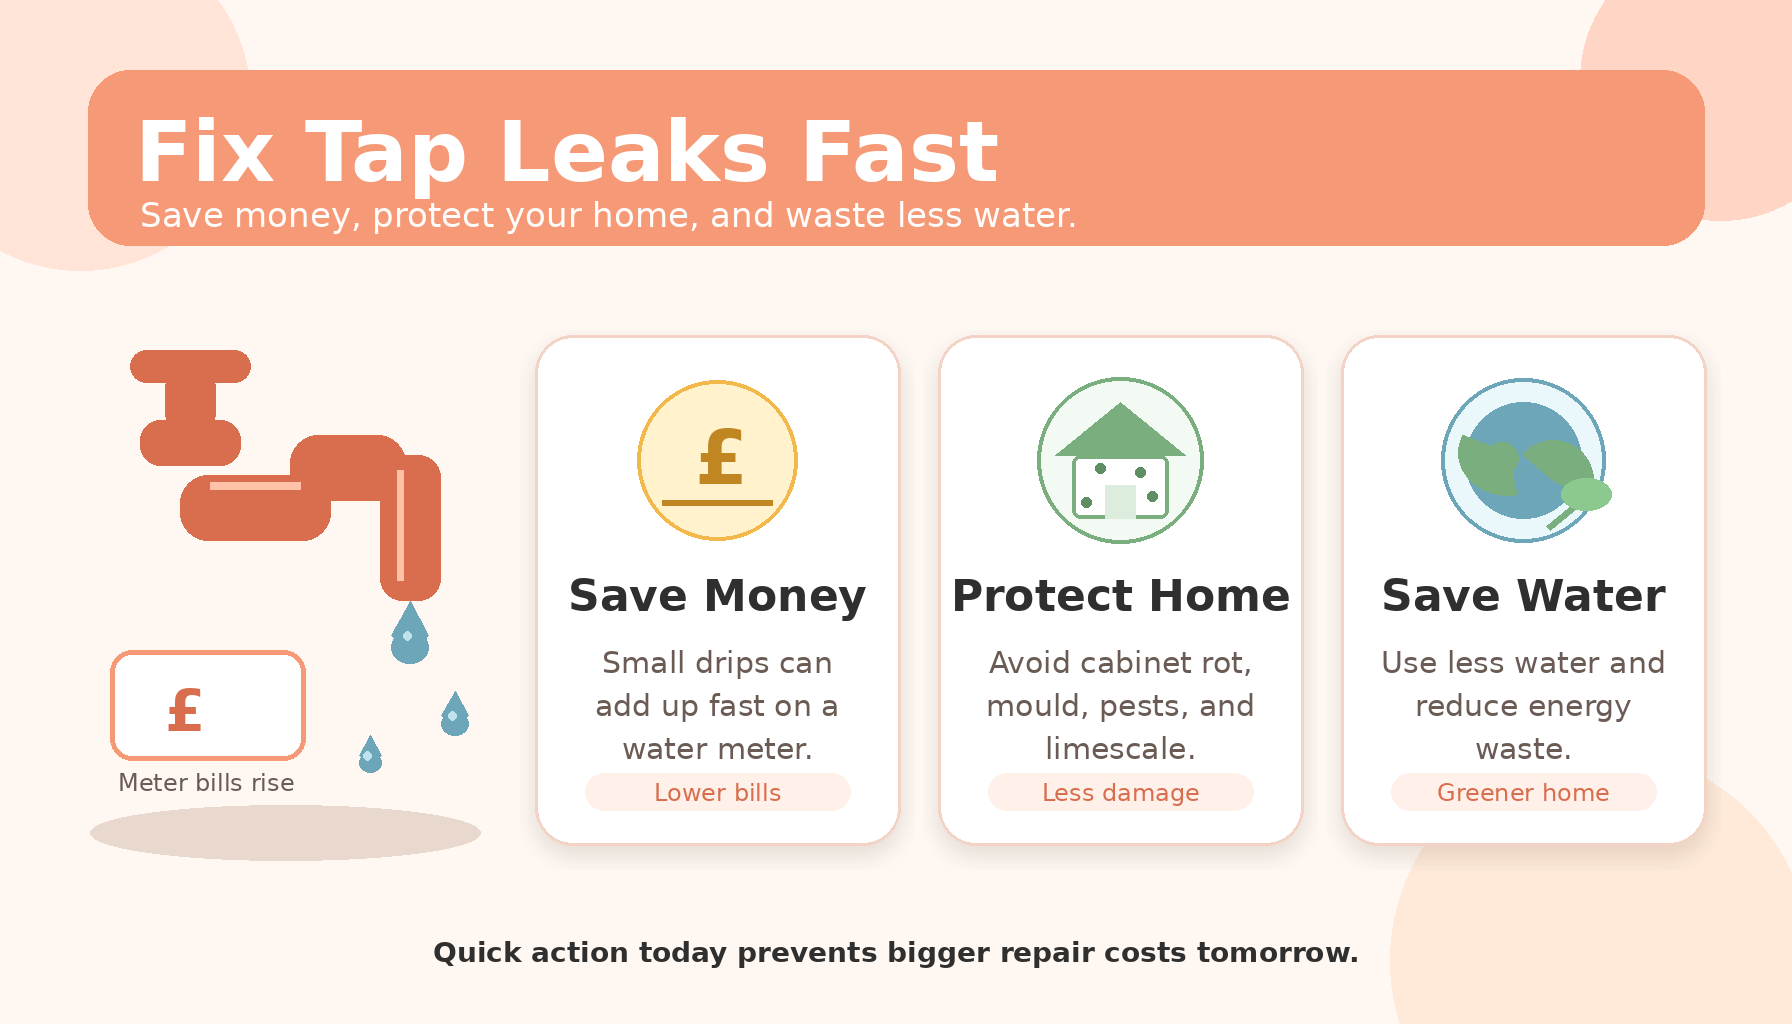
In the United Kingdom, water companies charge for every drop used. If you have a meter, a leak is very expensive. Small drips eventually turn into large sums on your bill. Therefore, learning to fix a leaking tap saves money. You can use that extra cash for your family instead. Most people are shocked by how much they actually save. Preventing waste is a very smart financial move for everyone.
Property Damage and Limescale
Leaking water does not always stay inside the sink basin. Sometimes, it can seep into the kitchen cabinet below. This moisture leads to rot and smelly green mould. Additionally, UK water is often hard, meaning it contains many minerals.
This causes white, crusty limescale to build up around your tap. Limescale can permanently ruin the shiny finish of your metal fixtures. Constant dampness can also attract unwanted pests into your kitchen. Because of this, acting quickly protects the structure of your home.
Environmental Impact
We must all try to protect our beautiful planet together. Water is a precious resource that we should never waste. Using less water helps the UK environment stay healthy.
It reduces the energy needed to process and pump water. Every small action contributes to a much greener local community. You are teaching your children to respect our natural resources too. This simple repair makes a big difference for future generations.
What Tools and Parts Do I Need to Fix a Leaking Tap?
The Essential Tool Kit
To succeed, you need to gather a few basic items. You might already have these in a kitchen drawer. If not, local DIY shops like B&Q sell them cheaply. You will need an adjustable spanner for the nuts. This tool can change size to fit different pipe parts. Next, find both cross-head and flat-head screwdrivers for the handles. These are essential for reaching the hidden internal parts. You should also keep a soft cloth nearby for spills. Having everything ready makes the job much smoother and faster.
Finding the Right Replacement Parts
You must buy the correct parts before taking things apart. Most traditional UK kitchen taps use a standard rubber washer. These are usually ½ inch or ¾ inch in size. However, ceramic taps need a specific type of plastic cartridge. It is often best to take the old part with you. Go to a hardware store and show it to the staff. They are usually very friendly and happy to help you. Using the exact part ensures that the leak stops completely.
Safety First: The Magic Stopcock
Before touching any metal, you must turn off the water. If you forget this, water will spray everywhere instantly. You need to locate your internal stopcock or isolation valve. Usually, the stopcock is found under the kitchen sink area. Turn the handle clockwise until it cannot move any further. Then, turn on the tap to let out remaining water. Once the water stops flowing, it is safe to begin. This is the most important rule for any home plumbing.
- Adjustable Spanner: For loosening the large brass nuts.
- Screwdrivers: To remove the decorative caps and handles.
- Replacement Washers: To replace the old, worn-out rubber.
- WD-40 Spray: Useful if the metal parts are stuck.
How to Identify Your Tap Type?
Not all taps are built in the same way in British kitchens. You must identify your tap type to choose the right repair method. Generally, there are two main types of taps found in most homes.
Traditional Taps
These are the older style of taps with separate handles for hot and cold. You usually have to turn the handle several times to get water. These taps use a small rubber washer to stop the water flow. Over time, the rubber becomes hard or cracked, which causes the leak.
Modern Ceramic Disc Taps
Many modern kitchens use taps with a single lever or “quarter-turn” handles. You only move these handles a little bit to turn them on. Instead of rubber, they use two smooth ceramic discs to control the water. These parts are usually contained inside a plastic piece called a cartridge.
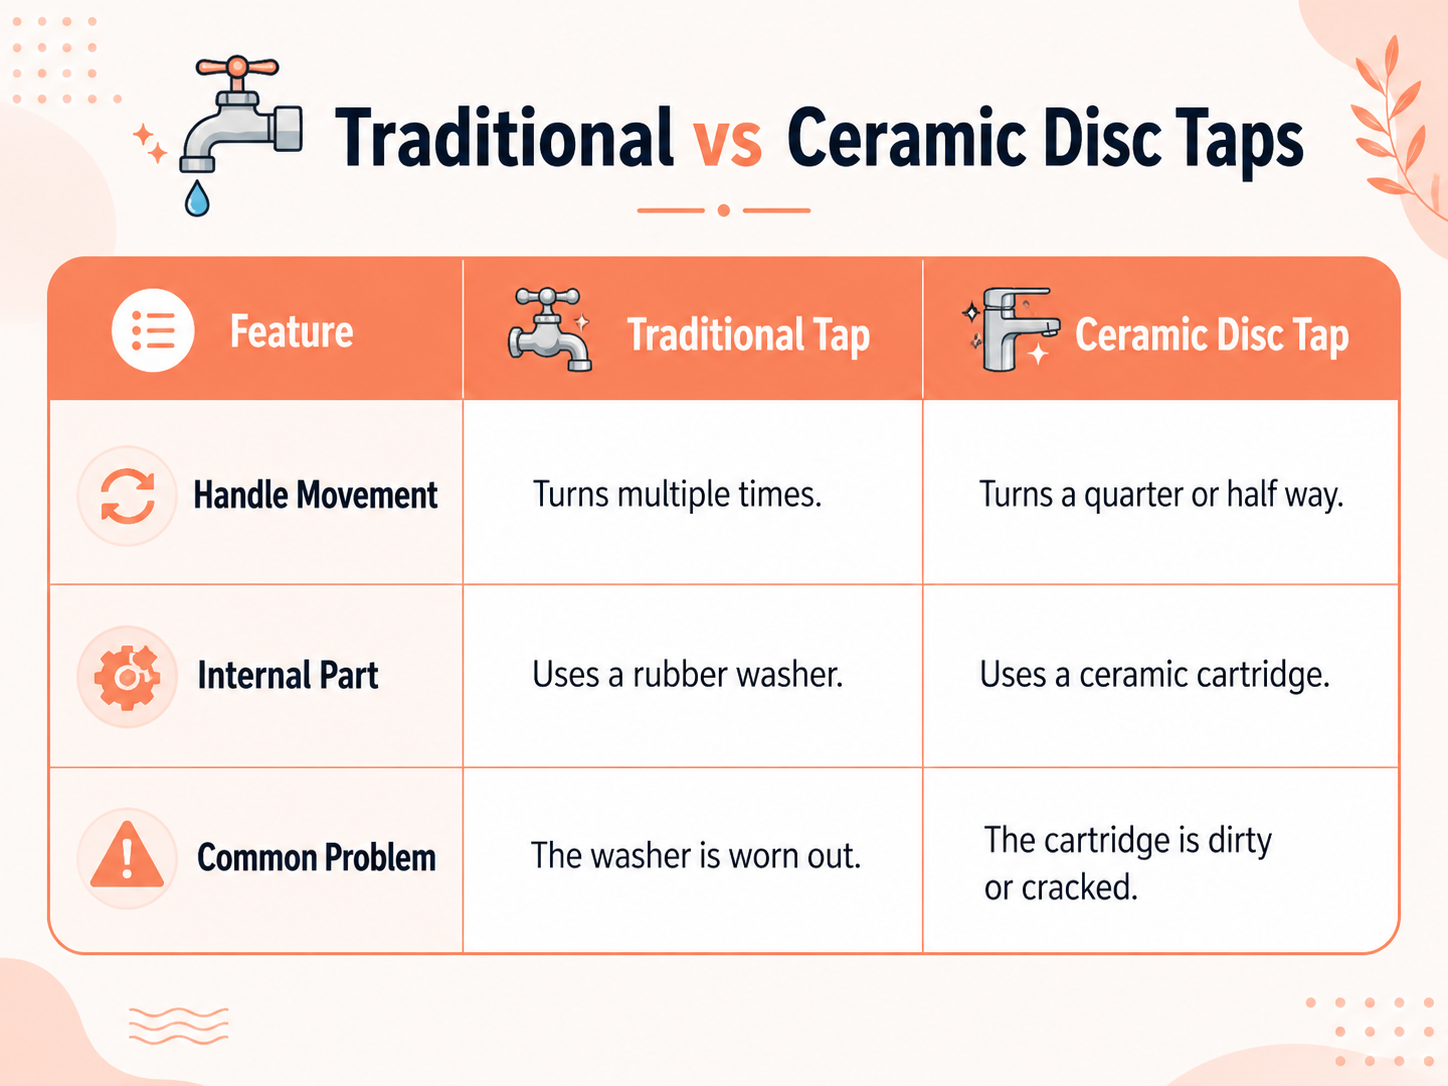
Identifying your tap correctly is essential for fixing a leaking tap. If you have a lever tap, buying a rubber washer is useless. Similarly, a cartridge will not fit inside an old-fashioned pillar tap. Take a close look at how your tap moves before you go shopping.
What are The Steps to Fix a Leaking Tap at Home?
Step 1: Turn off the water supply
You must stop the water from flowing. Find the isolation valves located right under your sink. Turn the small metal screw until it stays horizontal. Alternatively, you can use the main house stopcock. Open the tap to drain any remaining water. This prevents a big mess during your repair work. It ensures your kitchen floor stays completely dry.
Step 2: Remove the tap handle
Next, you need to remove the tap handle. Look for the decorative hot or cold caps. Carefully pry the cap off with a flat screwdriver. You will find a hidden screw sitting underneath it. Place this tiny screw safely into a small cup. Now pull the handle straight up to remove it. You can now see the parts inside the tap.
Step 3: Disassemble the tap
Use an adjustable spanner to loosen the brass nut. Hold the tap firmly so it does not twist. Turn your spanner anti-clockwise to release the inner part. If the metal is stuck, try using WD-40. Afterwards lay the parts out on a clean towel. This helps you remember the correct order for later.
Step 4: Replace the faulty part
Examine the bottom of the part you just removed. Replace the old, squashed rubber washer with a new one. However, modern taps might need a whole new cartridge. Ensure the new part matches your old one exactly. A fresh seal will stop that annoying dripping sound.
Step 5: Reassemble and test
Finally, put all the pieces back together again. Screw the headgear back in and tighten it gently. Replace the handle and the tiny metal holding screw. Turn the water supply back on very slowly now. Check for leaks and let the trapped air out. You have successfully finished your first plumbing task today!
Why Is the Tap Still Leaking After Replacing the Washer?
Sometimes, you follow every step but the water continues to drip slowly. Do not feel frustrated because this happens to many DIY beginners.
Common Issues to Check:
One common problem is a damaged “valve seat” inside the tap body. The valve seat is where the rubber washer presses down to stop water. If this metal part is corroded, the washer cannot make a perfect seal. You may need a tool called a “seat grinder” to smooth it.
Another issue involves buying the wrong size of washer or ceramic cartridge. British taps come in several different standard sizes for kitchen and bathroom use. Even a tiny difference in size can allow water to seep through. Always double-check your measurements at the hardware store before buying new parts.
Additionally, look at the very base of the tap spout for leaks. If water leaks from the bottom of the neck, the O-ring is broken. The O-ring is a very thin rubber loop found inside the spout base. Replacing this part is very easy and usually stops that specific type of leak.
Furthermore, check for any limescale buildup inside the metal tap components. Limescale is a hard white substance often found in “hard water” areas of England. You can remove it by soaking the parts in a bowl of vinegar. Clean parts always work better and last much longer than dirty ones.
Conclusion on Fix a Leaking Tap
By following these steps, you save money on expensive plumbers. You also help the UK environment by stopping water waste. Remember to always turn off the water before you start. Use the right tools and take your time with every step. Most plumbing jobs are just about patience and the right parts. Want to master more DIY repairs around the house? If you found this guide helpful, you can take our Professional Online Plumbing Course.
If the leak continues, do not feel bad about it. Some plumbing issues are very complicated even for the experts. If you see water leaking from the pipes, call a professional. Always ensure your plumber is qualified for the specific job required. For gas-related water heaters, use a Gas Safe registered engineer only. Fixing things yourself is great, but safety is always the priority. You should be very proud of learning these new home skills. Enjoy your quiet, drip-free kitchen and your lower water bills this month!
FAQs
1. How do I stop my kitchen tap from dripping?
- Turn off the water supply and check the washer, O-ring, or cartridge. Replacing a worn part often stops the drip.
2. Can I fix a leaking tap myself?
- Many minor tap leaks can be fixed with basic tools and replacement parts if you follow the manufacturer’s instructions.
3. Why is my kitchen tap dripping when the water is off?
- A worn washer, damaged cartridge, or faulty valve may not be sealing properly, allowing water to drip.
4. What is the most common cause of a leaking tap?
- The most common cause is a worn washer or cartridge that no longer creates a watertight seal.
5. Do you need a plumber to fix a dripping tap?
- Simple leaks can often be repaired yourself, but a plumber may be needed for complex or persistent issues.
6. How much will a plumber charge to fix a dripping tap?
- In the UK, fixing a dripping tap typically costs between £50 and £150, depending on the repair and location.